|
When you walk into a library you may see a row of cabinets filled with old microfilm. Microfilm’s history starts as far back as 1839, with experimental novelty texts being produced by an English scientist, John Benjamin Dancer. He was known as the “Father of Microphotography”. In the Autumn of 1839 on a daguerreotype plate with the reduction of 160X John Benjamin Dancer had successfully made a microphotograph. That microphotograph that once was viewed with the use of a microscope was an essential tool during the Franco-Prussian War, when Prussia had surrounded Paris. All forms of communication had been cut off from Paris to France. Pigeons were then used to carry the microphotographs that contained important messages across the German lines to the besieged city of Paris. That was a beginning step in technology that has allowed us to store important documents over the years. But as technology changes the more obsolete the microfilm has become. They may be obsolete but by no means have they become less useful. For they hold documents that can shed much light on the lives and history of our ancestors told in books, newspapers and old files. It doesn’t matter which country your ancestors were from, microfilm was used as a way of storing history. So, let’s look at some of the machines that are used to read these microfilms.  Light Projection Microfilm Reader Some of us may recognize the Light Projection Microfilm Reader, since we probably used it at one time or another. There are some as of today, that are still in use. These microfilm machines have light shining through the microfilm that then projects an image onto the screen. On the side of the machine is a crank that is used to move from one image to the next. On the bottom front of the machine near the right side, is the speed option for fast or slow. On the bottom front, in the middle is where you will have the option to use high or low light. There may be a third button that provides you the option to print in black and white. However, due to the limitations of technology these machines do not always provide clear sharp images. 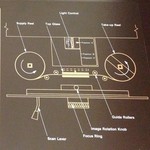 Turn the machine on by pressing the button in front. Lift the glass to the opening position. Place the microfilm on the spindle on the left side, making sure the film is going counter clockwise. Thread the microfilm between the upper and lower rollers on the left side and then between the glass. Once through the glass, thread the microfilm between the rollers on the right side. Insert the film into the take up reel. Wind the reel a few times and then use the crank on the side of the machine to turn the microfilm to the first image. To center the microfilm image, grab the scan lever and adjust by going vertically or horizontally. If the image needs to be rotated, grasp the image rotation knob located above the lens, yet under the glass tray. The focus ring located on the lens allows you to focus the image to your needs. You are now ready. 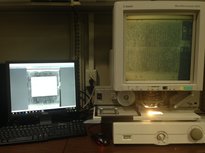 Cannon Microfilm Scanner 300 IIAnother Microfilm machine that is used today in some libraries is called the Canon Microfilm Scanner 300 II. This machine works with the computer program Capture Perfect. This program allows you to save the documents to your flash drive / external hard drive or print. Turn on the Canon Microfilm Scanner by pressing the power switch on the left-hand bottom front side. When placing the microfilm on the machine first pull out the tray. Place the microfilm on the spindle on the left side, making sure the film is going clockwise. Feed the film under the big roller and the glass, taking it over to the take-out reel. Slowly turn the image turn dial on the right-hand bottom front side of the machine clockwise till the take-out reel catches the film. Wind the reel a few times to turn the microfilm to the first image. Place the tray back underneath machine and begin searching for the desired image using the image turn dial. 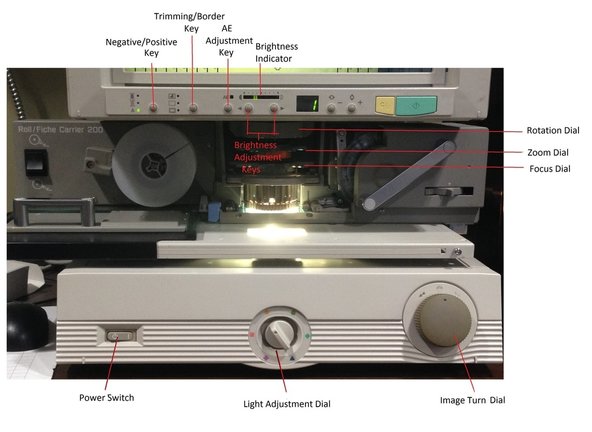 The light adjustment dial in the middle on the bottom front of the machine is used when the intensity of the lighting needs adjustment. This allows for a greater magnification of the image. To adjust the focus, the lens has two dials. The zoom dial allows for zooming in and out of the image, while the focus dial focuses on the image to your specifications. The rotation dial will allow the image to be turned in the direction needed. There are several different keys located under the screen to assist you better. With the negative/positive key you have 3 options: 1) Negative film mode, in which a positive output is created from a negative film image. 2) Positive film mode, in which a negative output is created from a positive film image. Or 3) Automatic mode, in which the machine selects the mode based on the microfilm recognized. The AE adjustment key is another important item to know about. It allows the machine to decide the brightness of the image produced on computer or print. However, if you prefer to control the brightness manually then use the brightness adjustment keys. The brightness indicator will assist you in your decision of the brightness of the document. Always feel free to ask the librarians for further assistance if needed. To read more about the history of microfilm, the author, Dick Eastman, wrote a wonderful article called The Death of Microfilm. Hope by reading this, it will familiarize you to some machines that can open a whole new door in your search for ancestors that can be found on microfilm.
0 Comments
Leave a Reply. |
Penny Alvarez-KellerGraduated from Arkansas Tech University with a degree in Management / Marketing and a degree in Economics / Finance Archives
February 2023
Categories
All

|
Digging Up Deep Roots
 RSS Feed
